File>export>quicktime>fullquality>save in movies folder
.
Next, adjust permissions and then drop the video into the classes folder on the vidstore server.
To adjust permissions:
Control-click on the file in your movies folder and select 'get info'. Please click on the down arrow at the bottom of the file and make sure that everything under details and ownerships and permissions is set to 'read-write'. All four sections need to be changed.
Next, log onto to Vidstore.shorelineschools.org and drop it in the period 1/6 folder.
name:scvideo
password:otis
Select SC Video classes.
Drop your file in the correct period.
Tuesday, December 18, 2007
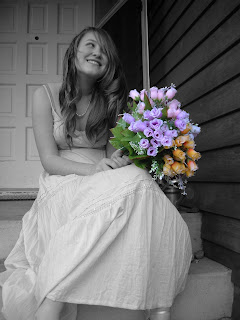
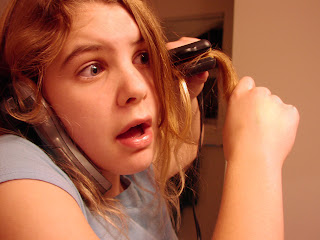
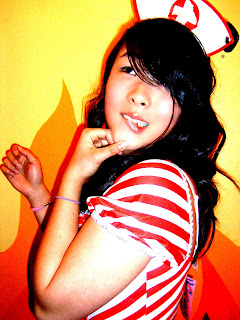
Self-Portrait Assignment
Self Portrait Assignment
A self-portrait comes from within. Injecting 'those we love' into the portrait steers one away from the harder task to trying to reveal self without adornment.
You will shoot four different self-portraits over break. You need to pick four photo types from the following five categories.
1. A self-portrait where color is emphasized. Color may include wardrobe, location, props, or natural objects. Think of your picture as a one or two color concept picture.
2. A picture that emphasizes lighting and shadows. This will be a grayscale self-portrait.
4. A fantasy self-portrait. Dress up and use costumes. In this self-portrait you can use Photoshop to enhance your picture in any way, shape, or form. Transfer yourself to Hawaii or become a Viking like you have always wanted.
5. The Supermodel self-portrait. Dress up like a GQ or Cosmopolitan magazine model. This can be a grayscale or color picture. You will use Photoshop to airbrush and enhance this photo.
First of all, I want you to look at the photos on the following websites for self-portrait ideas and then answer the following questions. Please use text edit, Abi Word, or Word and drop the answers into the proper class folder.
http://www.teachingphoto.com/school_work.html
Also, go to Getty Images and do a portraits search (self-portraits on getty show people taking pictures of themselves. We do not need to see the camera)
What four categories do you think you will pick? Why?
What are your interests and hobbies that you can showcase in your self-portrait?
What colors will be the best for you to work with for self-portrait where color is emphasized? What are your favorite colors?
Do you have any costumes or props you can use for the self-portraits?
Next, I want you to grab two separate sheets of paper and sketch two of your ideas for self-portraits. Include location, outfits, poses, costumes, and facial expressions etc. I realize that not everything is an amazing artist, but do your best.
Hints for self-portraits:
Use colors or lighting to create a concept.
Costumes or uniforms work great.
Change angles.
Use props.
Vary the lighting.
Try different emotional looks.
Pose in action.
Most importantly for this assignment don't forget your composition rules. Use framing, leading lines, rule of thirds, color contrast etc. to enhance your photo. Fill the frame.
Thursday, December 13, 2007
iMovie Slideshow
Slideshow
- Move your adjusted pictures to iPhoto.
- Open iMovie
- Use Ken Burns effect for pictures.
- Drag pictures into iMovie timeline.
- Add music.
- Edit pictures to the beat if possible.
- You can adjust the length of time the picture plays as needed.
- Add title over black at beginning of slideshow.
- Add titles to pictures as necessary to explain your slideshow.
- Fade in and out music
Tuesday, December 04, 2007
Photo Essay
The Photo Essay Pictures are due Tuesday/Wednesday.
The written review is due Monday for both classes.Photo Essay...
http://en.wikipedia.org/wiki/Photojournalism
http://en.wikipedia.org/wiki/Photo_essay
 Photo Essays tell stories with pictures in ways that words cannot. They show us the faces of joy, pain, pride and fear.
One famous photo essayist was Larry Burrows. Burrows was killed in a helicopter crash in Vietnam but his work helped show the face of war to Americans.

TimeLife.com has a Burrows memorial page that has some of his photographs including 15 photographs that served as covers for Life Magazine. This photo is from the cover of his book, Vietnam. You can see some of the photos from this link to the book on Amazon.com.
Time and Life magazines both have a long history of photo journalism. Many of these photo essays are on-line and available for viewing.
 Assignment - Photo Essay (Part 1)
In this assignment you will create your own photo essay. To help prepare you for this you should review some other photo essays and prepare a report.
Select a photo essay from the Time.com web site.
Select one essay and to review it. You will need to respond to these points in a word processing program:
- Did the photographer use staged photos, candid photos or both?
- Color or B&W? Did it make a difference? What factors contributed to the selection of one over the other?
- Find examples of good framing and composition and point them out. How close do the subjects feel in the photo?
- Find examples of good use of color and light. Do you see backlighting? Were the photos taken early or late in the day?
- How much narration and text support the essay?
- Do the photos in the essay stand alone or do they need to be seen as a part of the whole?
- Describe your reaction to the essay. Do all photo essays illicit a reaction in the viewer?
Criteria:
- Minimum of 8 photos
- Single theme or "story" for the essay
- Consider the following in composing your photographs:
- Color or B&W
- Composition
- Lighting
- Angle and distance to subject
- Candid or posed photos?
- Consider the need for text to accompany each photograph.
Sunday, December 02, 2007

Saturday, December 01, 2007


Wednesday, November 28, 2007
Friday November 20th
Today you will do one of two things:
1. You will use the entire period to shoot your photo. Make sure you have all of the exact details for your shot. Shoot as many versions as you want. I will only see one.
Lighting, location, subjects, facial expressions, and other props count.
2. You will research your photographer and write your one page typed (minimum) paper answering the questions listed on the blog below. Papers will be approximately three-four full paragraphs long. You can use Abi Word, text edit, or you may use your WORD on your laptops to type.
If you choose to write today, you will need to take your picture over the long weekend.
I have asked the sub to leave me names of any students who decide to stay off task during class.
Have fun!
You will have 45 minutes during class Tuesday to manipulate and print your photo.
Your photo, the artists photo you replicated, and your typed paper will be turned in to me at 1:30 PM on Tuesday.
Please email me if you have any questions.
Tuesday, November 27, 2007


Masters of Photo Shooting Assignment
Once you have selected the photographer of your choice from the list below please determine an image(s) or technique of theirs you would like to try and replicate. You task is to mimic their photographic style and aesthetic principles with your own photograph. Imitation is the best form of flattery, and this is your task.
Example:
Herman Leonard: known for photographing jazz legends both in portraits and in jazz clubs. Images were black and white with stark contrast and vivid lighting. To mimic his style you could shoot images of an indie band at a show with similar conditions (intense lighting, black and white, high contrast, etc.)
You will be printing out one image of your photographer and one of your own creation in line with their style and technique...
MASTERS OF PHOTOGRAPHY WRITTEN ASSIGNMENT
MASTERS OF PHOTOGRAPHY WRITTEN ASSIGNMENT
In no LESS than one page please explain:
• Who you chose and who they are (i.e. when, where, what etc)
• Describe their photography (what is unique about her/his style and technique)
• And explain how he/she (or something they did, used, or created) has impacted or changed the world of photography.
• Why did you choose this photographer? What do you like about their work/style?
Note: Do not copy/paste text from web sites. I will check to make sure that everything written is in your words. Google is a fantastic tool for checking plagiarism.
Masters of Photography
Masters of Photography
• Abbott, Berenice
• Adams, Ansel
• Adams, Robert
• Alvarez Bravo
• Arbus, Diane
• Atget, Eugene
• Bellocq, E.J.
• Blossfeldt, Karl
• Brandt, Bill
• Brassai
• Callahan, Harry
• Cameron, Julia M.
• Coburn, Alvin L.
• Cunningham,Imogen
• DeCarava, Roy
• Doisneau, Robert
• Eggleston, William
• Evans, Walker
• Friedlander, Lee
• Gutmann, John
• Hine, Lewis
• Kertesz, Andre
• Klein, William
• Koudelka, Josef
• Lange, Dorothea
• Lartigue,Jacques H.
• Laughlin,Clarence J.
• Levitt, Helen
• Mapplethorpe,Robert
• Modotti, Tina
• Muybridge,Eadweard
• Nadar, Felix
• O'Sullivan, Timothy
• Outerbridge, Paul
• Porter,Eliot
• Riis, Jacob
• Rodchenko,Alexander
• Salgado,Sebastio
• Sherman, Cindy
• Smith, W. Eugene
• Sommer, Frederick
• Steichen, Edward
• Stieglitz, Alfred
• Strand, Paul
• Talbot,William H. Fox
• Uelsmann, Jerry
• Weegee
• Weston, Edward
• White, Minor
• Winogrand, Garry
Guy Bourdin
Cartier Bresson
Andreas Gursky
Annie Leibowitz
Click here to view some of these photographers images
Here are even more from Wikipedia
Wednesday, November 14, 2007


Wednesday, November 07, 2007
Reflections Assignment
You will shoot 24 pictures, inside and out-of-class, based on this theme "I can make a difference by...".
On Thursday/Friday you will import pictures, create a 24 picture Contact Sheet, and turn it in at the beginning of class. You will then spend 30 minutes max adjusting your best one picture. You will then send that photo to me, I will print it, and you will mount it on poster board. You will turn in your mounted picture to me along with a filled out entry form.
Note: you will need to bring an 11*14 sheet of poster board to class.
Suggestions:
Manipulate your photo using various forms of grayscale conversions.
If you have people in your picture, adjust their faces etc using various forms of the touch-up techniques we learned in class.
Adjust the colors in the picture to enhance certain features.
Tuesday, November 06, 2007
Help The Yearbook Class!
can you have your classes fill some discussions on my website, one titled "seniors" and one "travels"? We are trying to get info for the yearbook on students adventures and on childhood romances and crushes...
http://learn.shorelineschools.org/shorecrest/bstory/index.php?section=discussion
http://learn.shorelineschools.org/shorecrest/bstory/index.php?section=discussion
Sunday, November 04, 2007
Exporting Your Slideshow


You have all 50 minutes this period to finish and export your slideshow and turn in your lightsaber pictures. Both are due at the end of the period.
To export the slideshow:
highlight the slideshow, select export, type in naming convention, and export.
Next, adjust permissions and then drop the video into the classes folder on the vidstore server.
To adjust permissions:
Control-click on the file in your movies folder and select 'get info'. Please click on the down arrow at the bottom of the file and make sure that everything under details and ownerships and permissions is set to 'read-write'. All four sections need to be changed.
Josh Norton or Liz Caldwell may be able to help you if you need assistance.
Next, log onto to Vidstore.shorelineschools.org and drop it in the period 1/6 folder.
name:scvideo
password:otis
Select SC Video classes.
Drop your file in the correct period.
Put the completed lightsaber in the STAFF folder.
Thursday, November 01, 2007
You will only have the period today to shoot, edit, and turn in your finished photograph. Your assignment is to create a Star Wars lightsaber action scene. Please follow any one of the following tutorials to add a lighsaber to your photograph. Be creative with your poses, consider your background (photoshop one in...), and have fun!!!!
http://www.empiredezign.com/version2/portfolio/pages/tutorials/lightsaber.htm
http://www.bluesfear.com/tutorials/Lightsaber.php
http://www.users.on.net/~george/lightsabers_101/
http://r2.robotbuilders.net/cgi/DaiBuckley/index.htm

http://youtube.com/watch?v=8gUZt1u9QUw


http://www.empiredezign.com/version2/portfolio/pages/tutorials/lightsaber.htm
http://www.bluesfear.com/tutorials/Lightsaber.php
http://www.users.on.net/~george/lightsabers_101/
http://r2.robotbuilders.net/cgi/DaiBuckley/index.htm
http://youtube.com/watch?v=8gUZt1u9QUw
Wednesday, October 31, 2007
Touch-Up Techniques
Touch-Up Techniques in Photoshop
Clone Stamp, soft edge brush, lighten mode
Lasso clean area, feather, option-apple, drag and drop
Patch tool, select area you want to change, drag to clean area
Blur technique: Gaussian blur, adjust pixels, open history palette, click open, select history brush next to Gaussian blur, select history brush and paint blur onto photo
Color hair: change color balance, press x, option-delete, select brush, press d, begin painting
Whitening teeth: select teeth, feather, open hue and saturation, lower saturation on yellow, change back to master and raise lightness, deselect
Remove glair, hot spots, or glow: select clone stamp, darken mode, soft brush, 50% opacity, option click and then paint over “hot” areas
Tuesday, October 30, 2007
To Create Your Portrait Slideshow in iPhoto
To create a slideshow:
Drag all of your pictures you adjusted into a new album in iPhoto.
Select the album so it's highlighted in iPhoto.
Click the Add (+) button in the bottom-left corner of the iPhoto window, then click Slideshow in the dialog.
Type a name for your slideshow.
If you want, deselect the “Use selected items in new slideshow” checkbox.
Click Create.
Drag photos into the order you want in the photo browser at the top of the iPhoto viewing area.
After you create a slideshow, you can also add photos to it by dragging them directly from an Event, another album, a CD or DVD, or another location on your hard disk. When you add a photo to a slideshow from another location on your hard disk, iPhoto automatically imports it into your photo library.
You can choose music, specify the display duration for each slide, choose transition effects, display slideshow controls, and set other options
Wednesday, October 24, 2007
Photo Contest
North End Seattle High Schooler’s Photo Contest at
The Haller Lake Community Club
The Haller Lake Arts Council is putting on a High Schooler’s Photo Exhibition, to be hung on Saturday, Nov. 3rd. The show will be up for the Salmon BBQ event the following day. We are inviting the following 6 High Schools to participate: Nathan Hale, Ingraham, Shorecrest, Shorewood, Ballard, and Roosevelt. Awards to be determined.
Submissions: Each student can submit 1 black & white photo. All photos should be should be 8” x 10”. The image size can be smaller, and have a border. Bear in mind, viewers will stand 5 feet away from your image. Photos will be placed in an 11” x 14” clip frame, against a white or black backround. All entries must be submitted by Wed., Oct. 31st. Although the Art Council has no wish to place limitations on your work, we ask that you omit nudity or vulgar language, as the viewing audience will be families with children. Please leave your entry & completed application with your instructor in a large envelope. Nancy Cubbage and Nina Carmichael will pick up all entries from your photography teacher on Oct. 31st.
Students must pick up their work by 5:30 p.m. the day of the Salmon BBQ, Sunday, Nov. 4th. The exhibit will be juried by members of the Haller Lake Arts Council.
The Haller Lake Community Club is located in North Seattle, 3 blocks east of Aurora Ave N. at the corner of N 128th and Densmore Ave N.
12579 Densmore Ave N., Seattle, WA 98133
The application looks like this:
Haller Lake Photo Contest Application Form
Submit this application & one black and white photo entry 8” x 10” size to your photography teacher by Tuesday Oct. 30th. Your image can be smaller and have borders, bear in mind that your work will be viewed at a distance of 5 feet. As this is a family event, no nudity or images of vulgar language will be exhibited.
Name: ___________________________________________________________________
High school you attend: ______________________________________________________
Age: ______ Phone: _________________Email Address: ___________________________
Biographical statement (optional): ______________________________________________________________________________________________________________________________________________________________________________________________________________________________________________________________________________________________________________________________________________________________________________________________________________________________________________________________________________________________________________________________________
Title of photo: _____________________________________________________
Pick up your photo up at 5:30 p.m. after the Salmon BBQ / Arts & Crafts event Sun., Nov. 4th. If you are unable to pick up your work at that time, contact Nancy at nan808@speakeasy.net or at 206-789-6225.
Monday, October 22, 2007
Lighting
Lighting Styles
http://www.fodors.com/focus/focselect.cfm?catid=7
http://ndnd.essortment.com/photographyli_rawq.htm
http://www.fodors.com/focus/focselect.cfm?catid=7
- Creating Killer Headshots: The Cheap Way! - David Griffin
- A quick start guide to the one light setup - David Griffin
- Back Lighting - Studio Lighting Setup - StudioLighting.net
- Paramount (Butterfly) Lighting - Studio Lighting Setup - StudioLighting.net
- Multiple Light Portrait Setup Hints - David E. Price
- Short Lighting - Studio Lighting Setup - StudioLighting.net
- Broad Lighting - Studio Lighting Setup - StudioLighting.net
http://ndnd.essortment.com/photographyli_rawq.htm
Sunday, October 21, 2007
Plan For Class this upcoming week
- Monday: Import portrait homework from the weekend. Create contact sheet in Photoshop and send to Mr. Mitchell for viewing (but not printing).
- Tues/Wed: Students will have the whole period to shoot additional portraits. Students may create a concept for a student in class and shoot indoors with the lights or outdoors using natural lighting. Students may also choose to leave school and shoot another subject of their choice.
- Thursday/Friday: Students will manipulate images. Mr. Mitchell will review images and determine whether or not students need to take more pictures to get the
- ultimate" portrait.
Friday, October 19, 2007
Thursday, October 18, 2007
Portrait Hints
Color enhancement and tone
Lighting: use lighiting for effect
Background and location: make it interesting
Photo Shop Effects
Props
Costumes
Make-Up
Learn something about the photographer
Lighting: use lighiting for effect
Background and location: make it interesting
Photo Shop Effects
Props
Costumes
Make-Up
Learn something about the photographer
Portrait Assignment
1. Find an interesting human subject. The person you choose should WANT to be in the picture and they should be willing to cooperate.
2. Talk to your subject. Use colors or lighting to create a concept for your portrait. Costumes or uniforms work great. Imaginary ideas are OK. Choose an interesting setting based on your concept.
3. Change angles between shots. Shoot at least 24 pictures of the SAME subject.
4. Use props if they will help the audience learn something about the subject.
5. Vary the lighting. Use filters, flashlights, lamps, or multiple lights to enhance your picture.
6. Encourage different emotional looks. Pretend you are Austin Powers taking pictures. Tell your subject they are "groovy".
7. Having your subjects "pose" in action is just fine.
8. Most importantly for this assignment don't forget your compostion rules. Use framing, leading lines, rule of thirds, color contrast etc. to enhance your photo. Fill the frame.


Monday, October 08, 2007
Photomerge Examples


I created the Photomerge of Alki last summer, but the rest are student examples. Where will you shoot your Photomerge?
Please make at least five attempts at your subject. In other words you will have between 15 and 25 pictures by next Tuesday/Wednesday.
Use a tripod if possible. Remember to manual adjust white balance or select something like "cloudy" or "sunny" on your camera.
Be sure to read the hints in the article below.
Final Grayscale Assignment
Adjust your pictures using the five methods we discussed in class.
You will turn in one picture for each adjustment method.
Methods: Lightness Channel, Ansel Adams, Calculations, Duotone, and Gradient Map.
Make sure all pictures are cropped as needed, have a definitive subject, and have an extreme dark and light point. Proper photo composition is essential.
You will turn in one picture for each adjustment method.
Methods: Lightness Channel, Ansel Adams, Calculations, Duotone, and Gradient Map.
Make sure all pictures are cropped as needed, have a definitive subject, and have an extreme dark and light point. Proper photo composition is essential.
- When you are finished create a new Folder titled with your name.
- Drag all five of your pictures into this folder.
- Each picture should use the naming convention and indicate what method you used to adjust it. Make sure that ONE of your pictures has PRINT in the naming convention.
- Drop this folder into the STAFF server under the proper class period.
Thursday, October 04, 2007
Photomerge!!!
http://www.layersmagazine.com/making-perfect-panoramas-with-photomerge.html
Click the link above for help making the perfect Photomerge.
A very important point from the article: "Don 't use any automatic setting on your camera. If the focus, exposure, or white balance is set on auto, the camera will slightly shift the focal point, exposure, and color to reflect what it's pointing at. As you aim the camera from one area to the next, the changing exposure will make the merged images look splotchy. If you're photographing during the day, set the white balance to daylight or cloudy. For more critical color, do a custom white balance of the area you're shooting."
Wednesday, October 03, 2007
Friday, September 28, 2007
Printing Procedures
Send me 1 picture for printing.
1. Save picture as high quality jpeg using the naming convention and landscape as your assignment name.
2. Make sure you save in pictures folder.
3. Go to the staff server (staff.shorelineschools.org) and drop your picture in the proper period folder.
4. I will print from my computer.
1. Save picture as high quality jpeg using the naming convention and landscape as your assignment name.
2. Make sure you save in pictures folder.
3. Go to the staff server (staff.shorelineschools.org) and drop your picture in the proper period folder.
4. I will print from my computer.
Tuesday, September 25, 2007
Photo Homework


Your Photo Homework over the next five days is to shoot 24 images involving shadows and 24 images involving lightness/darkness relationships. You can shoot man made shadows as well as outdoor shadows.
Pictures are due Monday.
Thursday, September 20, 2007


Wednesday, September 19, 2007
Grades etc.
Photo students:
You will not be able to go out and shoot Thursday or Friday if your first assignment (camera composition) is not done or if you do not have at least a C in the class.
Students will be required to take 24 GOOD pictures during class this week and another 24 over the weekend.
Some students missed our quiz. A zero is in the grade book. Grades will go online tomorrow.
Contact me with any questions.
Mr. Mitchell
Sunday, September 16, 2007
Out of Class Shooting on Thurs and Fri
Good evening,
Thurday during sixth period and Friday during 1st period will be the first out-of-class shooting days. Students will be working at landscape pictures at a location of their choice.
Please plan ahead to arrange your ride. Do you have a car? Can a parent or relative drive you to a location? Can you take the bus? If so, do you know where to get the schedule?
Students will need to return 15 minutes prior to the end of the period to upload pictures and then to show me their progress (pictures). Any student who does not work during this time will not be allowed out the rest of the semester.
Thursday, September 13, 2007
Please see step #3 for Image Capture Use
To import pictures please do the following:
1. Plug in camera with USB chord or plug in Card Reader.
2. If you are importing ALL your pictures, open up IPhoto and select import. Your pictures will automatically go into the IPhoto library. (skip step three)
3. If you are only importing some of your pictures then open up Image Capture from the Applications folder. Once you are there select the 'download some' option. The select the pictures you want to download. The pictures should end up in your pictures folder on the hard drive. You will need to drag these pictures into IPhoto.
4. When you have all of your photos in IPhoto, you can drag each photo into the proper Photo album.
Tuesday, September 11, 2007
Homework For Thursday and Friday
Color Contrast
Rule of Thirds
Leading the Subject
Framing
Horizon Line
Patterns
5 angles
Any shots that you do not complete in class will be homework. Or, if you don't feel your class shots are that great, please re-do them outside of class.
Remember your USB Chords, Cameras, and extra batteries everyday.
Rule of Thirds
Leading the Subject
Framing
Horizon Line
Patterns
5 angles
Any shots that you do not complete in class will be homework. Or, if you don't feel your class shots are that great, please re-do them outside of class.
Remember your USB Chords, Cameras, and extra batteries everyday.
Monday, September 10, 2007
Weekend Key Terms
Key Terms From Weekend Reading
- lens speed
- iris
- f-stops
- aperture

The figure at the right compares f-stop sizes.
- depth of field
- selective focus
- macro setting
Strive for a Feeling of Unity
- compose scenes around a single center of interest
- Think of each shot as a statement
- observe proper subject placement
- leading the subject
- the rule of thirds
- The tone (brightness and darkness) of objects in a scene suggests weight
- balance mass
- leading lines
- frame the central subject matter
- Patterns
- Color Contrast
- Abstract
- odd number of prime objects
Thursday, September 06, 2007
Intro Reading
Please take notes on the bold faced words as you read. We will be shooting the various composition elements next week, and we will also have a short quiz as well.
http://cybercollege.com/tvp012.htm
http://cybercollege.com/tvp023.htm
(start reading the above link at Strive for a Feeling of Unity)
http://cybercollege.com/tvp024.htm
(Look at further examples at bottom of page)
http://cybercollege.com/comp_ex.htm
http://cybercollege.com/tvp025.htm
http://cybercollege.com/comp_ex2.htm
What kind of camera to buy?
If you have not bought a camera yet, please purchase one with at least 4 megapixels. This will ensure that the pictures you take can be blown up to print at at least 8.5 *11. If you can afford a camera with more megapixels, by all means get it. A camera with a high optical zoom is nice. Digital zoom doesn't mean much so don't be mislead by a high digital zoom (I'll explain more in class).
I know Canon cameras better than any other brand and I highly recommend them, but if you end up with a Nikon or Olympus etc. you should be fine.
You should be able to find a decent camera at Fry's or Best Buy for as little as $150-$175. Some really great cameras can be found in the $300-$400 range.
Please see me if you have questions.
Academic Plan
COURSE SUMMARY
This class is an introduction to photography with an emphasis on using digital cameras and software programs designed for digital images. The class includes shooting photographs, importing images and manipulating them using Photoshop CS and IPhoto. The class will focus on mastering basic technical skills, creating artistic compositions, learning some history of photography, and learning about occupational options for photographers.
MATERIAL USED IN CLASS
There will be a $20.00 fee for ink and paper. Student must bring their own digital camera and USB cable to each class everyday.
ESSENTIAL LEARNINGS
The Essential Academic Learnings in Art for this course
1. The student applies the creative process with arts knowledge and skills to reason
and solve problems.
2. The student uses at least one of the art forms to communicate ideas and feelings.
3. The student understands how the arts connect to other subject areas, life, and work.
The Essential Academic Learnings in Communication for this course
1. The student uses listening and observation skills to gain understanding.
2. The student communicates ideas clearly and effectively.
CLASS EXPECTATIONS
• Assisting students in establishing lifelong habits of reliability and promptness is one of the instructional objectives of this particular course. Progress toward this goal will be measured, at least in part, by tracking student attendance. Therefore, a student's grade or credit in this class may be adversely affected by reason of tardiness or absences to the extent defined by the current Shorewood High School Attendance Policy, which is hereby adopted for this class. In accordance with this policy, students with 9 or more absences will lose credit.
• If you are not in class when the bell rings, you are tardy. Tardies cannot be made up. It is your responsibility to be in class on time and prepared to go to work
• You cannot have more than:
3 tardies per semester to earn an “A”
6 tardies maximum per semester to earn a “B”
9 tardies maximum per semester to earn a “C”
12 tardies maximum per semester to earn a “D”
13 or more tardies, student will fail
• Demonstrate good leadership and citizenship through your actions in class.
• Keep a notebook including any and all assignments, notes, and all handouts.
• Keep up with the assignments.
CRITERIA USED TO DETERMINE GRADES
Assessment of student progress toward mastering the Essential Learnings identified for this course is critical to student success. In addition to traditional assessment strategies (e.g., pencil and paper testing), assessment of students’ work in this class will include one or more of the following assessment strategies: student exhibitions, class presentations, artistic representation of core concepts, and multimedia presentations.
Grades:
Projects are worth 50% of your grade.
Tests and quizzes are worth 30% of your grade.
Attendance, attitude, and participation are worth 20% of your grade.
A = 100 – 93% B- = 83.9 - 80% D+= 69.9 - 67%
A- = 92.9 - 90% C+ = 79.9 - 76% D = 66.9 - 60%
B+ = 89.9 - 87% C = 75.9 - 72% F = 59.9 - 0%
B = 86.9 - 84% C- = 71.9 - 70%
PROCEDURES AND EXPECTATIONS RELATED TO
HOMEWORK
Students will be assigned homework on a regular basis. Homework will be turned in on time. Late work will receive a reduction of one grade per school day late. Work will not be accepted five school days after the due date.
Equipment
Students, and therefore parents and guardians, are responsible for any and all equipment checked out during class or after school. This may include digital cameras valued at $800, Tripods valued at $80, and lighting reflectors valued at $60. If equipment is damaged or lost it must be repaired or replaced immediately.
Laptops will be used in this class only as directed by instructor.
Classroom Expectations
1. Be on time to class.
2. Show up ready for the job. Have paper, pencils, pens, videotapes, cameras, USB Cables & any related material you need to do class assignments everyday.
3. Food & liquids are not permitted in the computer labs.
4. You will rarely need laptops in this class. Only take them out when I give permission. Do not test me on this.
5. Clean up your station area before you leave.
6. Return equipment to its proper place.
7. Turn off monitors when instructed.
8. Use headphones to monitor sound. Bring headphones to class everyday.
9. Games on the computer are not allowed ever.
10. Listen respectfully. You will be given the same respect when you speak.
Thursday, June 21, 2007
Exporting and sending Slideshow
Export your slideshow from IPhoto. File Export or share slideshow. Select highest quality or large file. Save to your movies folder.
Adjust Permissions on your Quicktime (slideshow) file.
Select your music video file. Control-click on the file in your movies folder and select get info'. Please click on the down arrow at the bottom of the file and make sure that everything under details and ownerships and permissions is set to 'read-write'. All four sections need to be changed.
Next, log onto to Vidstore.shorelineschools.org and drop it in the period (3,5,6) folder.
Login as registered user
name:scvideo
password:sc1
Select SC Video classes.
Wednesday, June 13, 2007
Slideshow Requirements
Requirements:
Ken Burns effect on all pictures. Use a variety of styles.
40-60 pictures
Music (1-3 songs)
fade in and fade out
audio fade in and out
transitions
Title at beginning
Titles for ten selected pictures
Around 4:00 long
Ken Burns effect on all pictures. Use a variety of styles.
40-60 pictures
Music (1-3 songs)
fade in and fade out
audio fade in and out
transitions
Title at beginning
Titles for ten selected pictures
Around 4:00 long
Sunday, June 10, 2007
This week
Hi eveveryone. Since I was not at school Thursday or Friday I am going to give everyone one extra day to work on their projects. You can use the 25 minutes tomorrow to make any finishing touches necessary for your projects. You can also work after school for 30 minutes also.
Period 6: Projects are due Tuesday.
Periods 3 and 5: Projects are due Wednesday.
Focus hard on writing a thorough reflection paper and don't forget to include all manipulations and camera techniques for each picture.
I owe each of you a few pictures printed and I will get to that this week as well.
I hope this extension helps you. There will not be any more extensions given. Please don't even ask.
Friday, June 08, 2007
Wednesday, June 06, 2007
Directions For Folders Etc.
Today in Photography:
1. Create a new folder (not album) in IPhoto. Entitle it Final Project.
2. Create new albums for each one of your final projects locations. Drag your photos into these specific albums.
3. Drag these albums into the Final Project folder.
4. Begin adjusting your pictures. Focus on brightness/contrast, exposure, color balance, curves, lighting effects, blurring, and channel mixer.
• Note: You can turn in grayscale and color photos. You can also turn in combinations. You can also create Photomerges, and Selective focus pictures.
5. Select your main photo for your features photo.
6. Resize other pictures to 3*5 and 4*6.
A good final project will showcase a variety of subjects shot from a variety of angles. A good final project will also showcase multiples effects and adjustments created in Photoshop.
Monday, June 04, 2007
Tuesday, May 22, 2007
Webquest for Digital Photo
I would like you to spend the period researching ideas and looking at examples for your project. You may use Word on your laptop, text edit, or Abi Word on the G5 computers.
Please get ten really good pictures from the internet that are similar to your theme. Make sure these pictures are shot by five different photographers. Spend at least 15-20 minutes searching for quality photos. For example, if your theme is fashion, you would search for pictures with a variety a subjects, shot from a variety of angles, using a variety of composition and color etc.
For each picture please do the following (in complete sentences):
1. Describe why you chose the picture. What made it stand out to you? Why is it interesting?
2. Describe the composition in the picture.
3. Describe the colors and how they help the picture. Or, if it is B and W, please tell us why that is a good choice.
4. Describe how the photo could work for your theme and concept.
(Please paste the picture in WORD or provide a link to the picture in Text Edit. This assignment works best if you use Word or Abi Word.)
Please compare and contrast the work of the five photographers. Do you see similarities? How are the photographers different?
Tell me if looking at pictures has given you new ideas for your project.
Please turn the assignment into the class folder at the end of the period.
Thursday and Friday will be all period shooting days.
Monday, May 21, 2007
Final Project Questions
Please answer the following questions in complete sentences.
1. What is your theme for your final project?Example: My theme project is Old America.
2. Why did you choose this as your theme? Be specific. 1-2 sentences
3. What type of locations will you choose to shoot your pictures? Why? Keep in mind that you will need to leave campus and most likely leave Shoreline.
4. What type of pictures do you hope to take? Action, portrait, landscape etc? A good photo essay will have a variety.
5. What kind of composition will you focus on in your pictures? You will need at least five composition elements (not counting rule-of-thirds). Yes, I want to know what you are attempting before you shoot.
5a. How will your pictures convey emotion?
6. Will you need class time to shoot? why or why not?
7. If you don't have a car, how will you make sure you get to your locations? Can your parents help? How about public transit?
8. This project should showcase everything you have learned in Digital Photography. How will you ensure this happens?
9. Is there anything you are unclear about in terms of composition or shot styles and angles etc. This is the time to ask.
Please copy these questions to your email. Answer these questions in detail and send the treatment to my email account. Please CC at least one of your parents or guardians on the email so they know they extent of this project. They may need to help with transportation.
Please write Photo and your period number in the subject.
Extra Credit Opportunity for Film Festival
Anyone who attends the film festival will receive substantial extra credit for Digital Photography. Video students will receive extra credit for Art Show attendance.
Thursday, May 17, 2007
Final Project For Digital Photography
Final Project
Photo Essay Assignment
Digital Photography
Mr. Mitchell
Assignment Requirements:
• First pick a general theme. For example, you might pick America, Democracy, or Responsibility. You will shoot photographs centered on this central theme.
• Use what you've learned about photographic composition, lighting, color, lines, texture and use your camera to make a statement. Each individual photo will be graded accordingly. (Review composition elements if necessary).
• Your photographs should make both a visual and emotional/political/critical/intellectual statement. Your photo essay should contain at least 9 photographs. Below each picture you will also describe the composition elements used on each photo.
• Your photo essay should be something unique, new, and your own view of your selected theme.
A one-page reflection is also required. In this paper you need describe what you learned during your project. What did you learn about your subject, Photoshop, and photography in general. What was easy and difficult about your project? What would you do differently if you did it again? Finally, how far along do you think you have come as a photographer this semester?
• You can shoot B & W, Color, or both. It’s your artistic choice.
• You may digitally alter your photos as necessary in Photoshop.
• Your pictures should be printed out either 3*5 or 4*6, two to three pictures per page with the exception of one photo that will be printed at 8.5 *11.
• Projects should be turned in on poster board with written with the written reflection attached. Look at examples at the front of the room.
• You will also be dropping this assignment in my drop box so that we may view each project in front of the class.
Exporting Your Video and placing it in the Vidstore server.

Export your slideshow from IPhoto. File Export or share slideshow. Select highest quality or large file. Save to your movies folder.
Adjust Permissions on your Quicktime (slideshow) file.
Select your music video file. Control-click on the file in your movies folder and select get info'. Please click on the down arrow at the bottom of the file and make sure that everything under details and ownerships and permissions is set to 'read-write'. All four sections need to be changed.
Next, log onto to Vidstore.shorelineschools.org and drop it in the period (3,5,6) folder.
Login as registered user
name:scvideo
password:sc1
Select SC Video classes.
Thursday, May 10, 2007
Self-Portrait Printing
Open Photoshop.
Create a new document at 8*10 inches.
Make sure the resolution is the same as your photos.
Put four different pictures on this document.
Save as a JPEG.
Create a new folder using the naming convention. The assignment is self-portrait.
Drop your self-portrait document in this folder.
Also, drop in the one main picture you would like printed.
Put this folder on the server in the classes folder in the proper period.
Monday, May 07, 2007
Turning In Self-Portraits
Self Portraits Will be due on Thursday/Friday.
You will not have any more class time to work on them.
When you are done, please create one document with four pictures on it. Please create a border for each picture.
Create a folder using the naming convention and drop the pictures into the folder.
Finally, add one large portrait in this folder. I will print this picture.
Friday, May 04, 2007
Abstract Picture Assignment


For this next assignment I want you to throw out all of the "rules" we've discussed in class this semester. This is your chance to be as creative as possible. I would recommend looking for patterns, colors, and shapes when deciding on pictures to take. Also try to think of things you don't normally see pictures of.
Tuesday, April 24, 2007
Self-Portrait Suggestions From Period 6
Color enhancement and tone
Lighting: use lighiting for effect
Background and location: make it interesting
Photo Shop Effects
Props
Costumes
Make-Up
Learn something about the photographer
Lighting: use lighiting for effect
Background and location: make it interesting
Photo Shop Effects
Props
Costumes
Make-Up
Learn something about the photographer
Thursday, April 19, 2007
Monday, April 16, 2007
Photomerge Info
To set up a new Photomerge composition:
Do one of the following:
Choose File > Automate > Photomerge.
In the File Browser, select the images you want to use and then choose Automate > Photomerge from the File Browser menu bar (see Running automated tasks from the File Browser).
In the dialog box, choose an option from the Use pop-up menu:
Files to generate the Photomerge composition using individual files.
Folders to use all the images stored in a folder to create the Photomerge composition. The files in the folder appear in the dialog box.
Open Files to use the image files you have open in Photoshop.
Click the Browse button to navigate to the source files or folder you want to use to create the Photomerge composition. Select Attempt to Automatically Arrange Source Images if you want Photoshop to try to line the images up in their proper order. Deselect this option if you want to arrange the images in the lightbox yourself.
You can add more files by clicking the Browse button again and navigating to the source files. You can always remove a file from the Source Files list by selecting the file and clicking the Remove button.
When you've added all the source files, click OK to create the Photomerge composition. The source files will open automatically and will be processed.
If the composition can't be automatically assembled, a message appears on-screen. You can assemble the composition manually in the Photomerge dialog box using the lightbox. (See Using the Photomerge dialog box.)
Once the new panorama image appears in the Photomerge dialog box, you can work with individual source files and change your view of the work area. If you need to rearrange the order of the images, drag an image in the work area to reposition it, or rearrange the images in the light box (see Using the Photomerge dialog box).
If necessary, adjust the vanishing point or blending settings of your composition (see Changing Photomerge composition settings.)
If you'd like to save each image in the composition as individual layers, which is useful if you need to correct the color of each image separately, select Keep as Layers.
Do one of the following:
Click the OK button to generate the panorama as a new Photoshop file. The composition then opens in Photoshop.
Click the Save Composition As button to save the composition so you can open it again at a later time.
Do one of the following:
Choose File > Automate > Photomerge.
In the File Browser, select the images you want to use and then choose Automate > Photomerge from the File Browser menu bar (see Running automated tasks from the File Browser).
In the dialog box, choose an option from the Use pop-up menu:
Files to generate the Photomerge composition using individual files.
Folders to use all the images stored in a folder to create the Photomerge composition. The files in the folder appear in the dialog box.
Open Files to use the image files you have open in Photoshop.
Click the Browse button to navigate to the source files or folder you want to use to create the Photomerge composition. Select Attempt to Automatically Arrange Source Images if you want Photoshop to try to line the images up in their proper order. Deselect this option if you want to arrange the images in the lightbox yourself.
You can add more files by clicking the Browse button again and navigating to the source files. You can always remove a file from the Source Files list by selecting the file and clicking the Remove button.
When you've added all the source files, click OK to create the Photomerge composition. The source files will open automatically and will be processed.
If the composition can't be automatically assembled, a message appears on-screen. You can assemble the composition manually in the Photomerge dialog box using the lightbox. (See Using the Photomerge dialog box.)
Once the new panorama image appears in the Photomerge dialog box, you can work with individual source files and change your view of the work area. If you need to rearrange the order of the images, drag an image in the work area to reposition it, or rearrange the images in the light box (see Using the Photomerge dialog box).
If necessary, adjust the vanishing point or blending settings of your composition (see Changing Photomerge composition settings.)
If you'd like to save each image in the composition as individual layers, which is useful if you need to correct the color of each image separately, select Keep as Layers.
Do one of the following:
Click the OK button to generate the panorama as a new Photoshop file. The composition then opens in Photoshop.
Click the Save Composition As button to save the composition so you can open it again at a later time.
Friday, April 06, 2007
Coloring Your B-Movie Poster
Image>Mode>grayscale
(image will flatten)
Image>mode>RGB color
create new layer (layer>new layer)
select paint brush (b)
select colors on color swatch
paint picture at 25-35% opactity
make sure you make a new layer for each section of paint
You can add text AFTER coloring if you want.
(image will flatten)
Image>mode>RGB color
create new layer (layer>new layer)
select paint brush (b)
select colors on color swatch
paint picture at 25-35% opactity
make sure you make a new layer for each section of paint
You can add text AFTER coloring if you want.
Thursday, April 05, 2007
Photomerge Assignment


Your assignment over break.
You will create Photomerge pictures. These are 3-5 pictures that overlap to show a wide landscape or cityscape (one big picture).
Your three Photomerges should be taken at three different locations at three different times of day: sunrise, afternoon, and sunset.
Summary
Three locations
One Photomerge from each location
make sure each Photomerge is taken at a different time
Subscribe to:
Posts (Atom)