Photomerge
When you set up a Photomerge composition, you identify your source files, and then the assembly of the panorama is automatically done for you. Once the panorama is complete, you can still make changes to the placement of the individual photos, if necessary.
To set up a new Photomerge composition:
Do one of the following:
Choose File > Automate > Photomerge.
In the File Browser, select the images you want to use and then choose Automate > Photomerge from the File Browser menu bar (see Running automated tasks from the File Browser).
In the dialog box, choose an option from the Use pop-up menu:
Files to generate the Photomerge composition using individual files.
Folders to use all the images stored in a folder to create the Photomerge composition. The files in the folder appear in the dialog box.
Open Files to use the image files you have open in Photoshop.
Click the Browse button to navigate to the source files or folder you want to use to create the Photomerge composition. Select Attempt to Automatically Arrange Source Images if you want Photoshop to try to line the images up in their proper order. Deselect this option if you want to arrange the images in the lightbox yourself.
You can add more files by clicking the Browse button again and navigating to the source files. You can always remove a file from the Source Files list by selecting the file and clicking the Remove button.
When you've added all the source files, click OK to create the Photomerge composition. The source files will open automatically and will be processed.
If the composition can't be automatically assembled, a message appears on-screen. You can assemble the composition manually in the Photomerge dialog box using the lightbox. (See Using the Photomerge dialog box.)
Once the new panorama image appears in the Photomerge dialog box, you can work with individual source files and change your view of the work area. If you need to rearrange the order of the images, drag an image in the work area to reposition it, or rearrange the images in the light box (see Using the Photomerge dialog box).
If necessary, adjust the vanishing point or blending settings of your composition (see Changing Photomerge composition settings.)
If you'd like to save each image in the composition as individual layers, which is useful if you need to correct the color of each image separately, select Keep as Layers.
Do one of the following:
Click the OK button to generate the panorama as a new Photoshop file. The composition then opens in Photoshop.
Click the Save Composition As button to save the composition so you can open it again at a later time.
Showing posts sorted by relevance for query photomerge. Sort by date Show all posts
Showing posts sorted by relevance for query photomerge. Sort by date Show all posts
Wednesday, November 16, 2005


Monday, April 16, 2007
Photomerge Info
To set up a new Photomerge composition:
Do one of the following:
Choose File > Automate > Photomerge.
In the File Browser, select the images you want to use and then choose Automate > Photomerge from the File Browser menu bar (see Running automated tasks from the File Browser).
In the dialog box, choose an option from the Use pop-up menu:
Files to generate the Photomerge composition using individual files.
Folders to use all the images stored in a folder to create the Photomerge composition. The files in the folder appear in the dialog box.
Open Files to use the image files you have open in Photoshop.
Click the Browse button to navigate to the source files or folder you want to use to create the Photomerge composition. Select Attempt to Automatically Arrange Source Images if you want Photoshop to try to line the images up in their proper order. Deselect this option if you want to arrange the images in the lightbox yourself.
You can add more files by clicking the Browse button again and navigating to the source files. You can always remove a file from the Source Files list by selecting the file and clicking the Remove button.
When you've added all the source files, click OK to create the Photomerge composition. The source files will open automatically and will be processed.
If the composition can't be automatically assembled, a message appears on-screen. You can assemble the composition manually in the Photomerge dialog box using the lightbox. (See Using the Photomerge dialog box.)
Once the new panorama image appears in the Photomerge dialog box, you can work with individual source files and change your view of the work area. If you need to rearrange the order of the images, drag an image in the work area to reposition it, or rearrange the images in the light box (see Using the Photomerge dialog box).
If necessary, adjust the vanishing point or blending settings of your composition (see Changing Photomerge composition settings.)
If you'd like to save each image in the composition as individual layers, which is useful if you need to correct the color of each image separately, select Keep as Layers.
Do one of the following:
Click the OK button to generate the panorama as a new Photoshop file. The composition then opens in Photoshop.
Click the Save Composition As button to save the composition so you can open it again at a later time.
Do one of the following:
Choose File > Automate > Photomerge.
In the File Browser, select the images you want to use and then choose Automate > Photomerge from the File Browser menu bar (see Running automated tasks from the File Browser).
In the dialog box, choose an option from the Use pop-up menu:
Files to generate the Photomerge composition using individual files.
Folders to use all the images stored in a folder to create the Photomerge composition. The files in the folder appear in the dialog box.
Open Files to use the image files you have open in Photoshop.
Click the Browse button to navigate to the source files or folder you want to use to create the Photomerge composition. Select Attempt to Automatically Arrange Source Images if you want Photoshop to try to line the images up in their proper order. Deselect this option if you want to arrange the images in the lightbox yourself.
You can add more files by clicking the Browse button again and navigating to the source files. You can always remove a file from the Source Files list by selecting the file and clicking the Remove button.
When you've added all the source files, click OK to create the Photomerge composition. The source files will open automatically and will be processed.
If the composition can't be automatically assembled, a message appears on-screen. You can assemble the composition manually in the Photomerge dialog box using the lightbox. (See Using the Photomerge dialog box.)
Once the new panorama image appears in the Photomerge dialog box, you can work with individual source files and change your view of the work area. If you need to rearrange the order of the images, drag an image in the work area to reposition it, or rearrange the images in the light box (see Using the Photomerge dialog box).
If necessary, adjust the vanishing point or blending settings of your composition (see Changing Photomerge composition settings.)
If you'd like to save each image in the composition as individual layers, which is useful if you need to correct the color of each image separately, select Keep as Layers.
Do one of the following:
Click the OK button to generate the panorama as a new Photoshop file. The composition then opens in Photoshop.
Click the Save Composition As button to save the composition so you can open it again at a later time.
Wednesday, January 13, 2016
Photomerge Assignment
Photomerge Assignment


Your assignment over the next week is to take multiple panorama style photomerges. Take a picture and then move the camera slightly up or sideways to take another "connected" image. Basically you combine smaller pictures to make one larger picture.
Use a tripod if possible. Remember to manual adjust white balance or select something like "cloudy" or "sunny" on your camera.
Here is how you connect multiple pictures in Photoshop.
To set up a new Photomerge composition:
Import Photos
Place pictures in a separate folder for each merge
Do one of the following:
Choose File > Automate > Photomerge.
In the File Browser, select the images you want to use and then choose Automate > Photomerge from the File Browser menu bar
In the dialog box, choose an option from the Use pop-up menu:
- Files to generate the Photomerge composition using individual files.
- Folders to use all the images stored in a folder to create the Photomerge composition. The files in the folder appear in the dialog box.
- Open Files to use the image files you have open in Photoshop.
Then edit your picture as you need.
Here is a tutorial you can use to get you going.
http://www.youtube.com/watch?v=qrNI-gAuI5s
Tentative schedule
Wednesday January 13: Practice at school up by the track,the front of the school or Hamlin. Take seven different photomerges comprised of 3-9 pictures each. Turn in Photomerge Practice Contact Sheet.
Merge your pictures in Photoshop using the directions above.
Friday January 15: All period off-campus shooting day. Pick an amazing location and shoot seven photo merges consisting of 3-9 pictures each. Turn in Photomerge CS1. These pictures will not be merged together.
Weekend Homework: Go to one landscape location and shoot seven different photo merges consisting of 3-9 pictures each. Turn in Photomerge CS2. These pictures will not be merged together.
Wednesday January 20: All period off-campus shooting day. Pick an amazing location and shoot seven photo merges consisting of 3-9 pictures each. Turn in Photomerge CS3. These pictures will not be merged together.
Friday January 22: Photomerge editing.
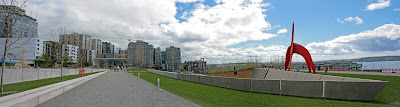
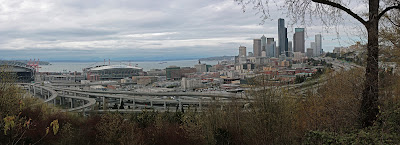
Weekend Homework: Go to one landscape location and shoot seven different photo merges consisting of 3-9 pictures each. Turn in Photomerge CS2. These pictures will not be merged together.
Wednesday January 20: All period off-campus shooting day. Pick an amazing location and shoot seven photo merges consisting of 3-9 pictures each. Turn in Photomerge CS3. These pictures will not be merged together.
Friday January 22: Photomerge editing.


Friday, January 06, 2017
Photomerge Assignment Overview
Your assignment over the next week is to take multiple panorama style photomerges. Take a picture and then move the camera slightly up or sideways to take another "connected" image. Basically you combine smaller pictures to make one larger picture.
Use a tripod if possible. Remember to manual adjust white balance or select something like "cloudy" or "sunny" on your camera.
Here is how you connect multiple pictures in Photoshop.
To set up a new Photomerge composition:
Import Photos
Place pictures in a separate folder for each merge
Do one of the following:
Choose File > Automate > Photomerge.
In the File Browser, select the images you want to use and then choose Automate > Photomerge from the File Browser menu bar
In the dialog box, choose an option from the Use pop-up menu:
- Files to generate the Photomerge composition using individual files.
- Folders to use all the images stored in a folder to create the Photomerge composition. The files in the folder appear in the dialog box.
- Open Files to use the image files you have open in Photoshop.
Then edit your picture as you need.
Here is a tutorial you can use to get you going.
http://www.youtube.com/watch?v=qrNI-gAuI5s
Tentative
Monday January 8: Practice at school up by the track,the front of the school or Hamlin. Take seven different photomerges comprised of 3-9 pictures each. Turn in Photomerge Practice Contact Sheet.
Merge your pictures in Photoshop using the
Wednesday January 13: All period off-campus shooting day. Pick an
amazing location and shoot seven photo merges consisting of 3-9 pictures
each. Turn in Photomerge CS1. These pictures will not be merged
together.
Friday January 15: Photomerge editing.
Weekend Homework: Go to one landscape location and shoot seven different photo merges consisting of 3-9 pictures each. Turn in Photomerge CS2. These pictures will not be merged together.
Wednesday January 18: All period off-campus shooting day. Pick an amazing location and shoot seven photo merges consisting of 3-9 pictures each. Turn in Photomerge CS3. These pictures will not be merged together.
Weekend Homework: Go to one landscape location and shoot seven different photo merges consisting of 3-9 pictures each. Turn in Photomerge CS2. These pictures will not be merged together.
Wednesday January 18: All period off-campus shooting day. Pick an amazing location and shoot seven photo merges consisting of 3-9 pictures each. Turn in Photomerge CS3. These pictures will not be merged together.
Tuesday, April 15, 2014
Photomerge Assignment
One of your assignments over Spring Break multiple landscape panorama style photomerges. Take a picture and then move the camera slightly up or sideways to take another "connected" image. Basically you combine smaller pictures to make one larger picture.
Use a tripod if possible. Remember to manual adjust white balance or select something like "cloudy" or "sunny" on your camera.
Here is how you connect multiple pictures in Photoshop.
- Import your pictures using Image Capture
- Create separate folders on your computer for each Photomerge and move the pictures into this folder
To set up a new Photomerge composition:
Do one of the following:
Choose File > Automate > Photomerge.
In the File Browser, select the images you want to use and then choose Automate > Photomerge from the File Browser menu bar
In the dialog box, choose an option from the Use pop-up menu:
- Files to generate the Photomerge composition using individual files.
- Folders to use all the images stored in a folder to create the Photomerge composition. The files in the folder appear in the dialog box.
- Open Files to use the image files you have open in Photoshop.
Then edit your picture as you need.
Here is a tutorial you can use to get you going.
http://www.youtube.com/watch?v=qrNI-gAuI5s
Thursday, October 31, 2013
Photomerge Assignment
Your assignment over the next five to six days is to take multiple landscape panorama style photomerges. Take a picture and then move the camera slightly up or sideways to take another "connected" image. Basically you combine smaller pictures to make one larger picture.
Use a tripod if possible. Remember to manual adjust white balance or select something like "cloudy" or "sunny" on your camera.
Here is how you connect multiple pictures in Photoshop.
To set up a new Photomerge composition:
Do one of the following:
Choose File > Automate > Photomerge.
In the File Browser, select the images you want to use and then choose Automate > Photomerge from the File Browser menu bar
In the dialog box, choose an option from the Use pop-up menu:
- Files to generate the Photomerge composition using individual files.
- Folders to use all the images stored in a folder to create the Photomerge composition. The files in the folder appear in the dialog box.
- Open Files to use the image files you have open in Photoshop.
Then edit your picture as you need.
Here is a tutorial you can use to get you going.
http://www.youtube.com/watch?v=qrNI-gAuI5s
Tentative schedule
Friday: Practice at school up by the track,the front of the school or Hamlin. Take five different photomerges comprised of 3-5 pictures each.
Return to class at 11:30.
Merge your pictures in Photoshop using the directions above.
Weekend Homework: Go to one landscape location and shoot five different photomerges. This means you will shoot about 15-20 pictures
Monday: editing
Wednesday: shooting day, go to an AWESOME landscape location to take more pictures
Thursday, January 08, 2015
Photomerge Assignment
Your assignment over the next week is to take multiple panorama style photomerges. Take a picture and then move the camera slightly up or sideways to take another "connected" image. Basically you combine smaller pictures to make one larger picture.
Use a tripod if possible. Remember to manual adjust white balance or select something like "cloudy" or "sunny" on your camera.
Here is how you connect multiple pictures in Photoshop.
To set up a new Photomerge composition:
Do one of the following:
Choose File > Automate > Photomerge.
In the File Browser, select the images you want to use and then choose Automate > Photomerge from the File Browser menu bar
In the dialog box, choose an option from the Use pop-up menu:
- Files to generate the Photomerge composition using individual files.
- Folders to use all the images stored in a folder to create the Photomerge composition. The files in the folder appear in the dialog box.
- Open Files to use the image files you have open in Photoshop.
Then edit your picture as you need.
Here is a tutorial you can use to get you going.
http://www.youtube.com/watch?v=qrNI-gAuI5s
Tentative schedule
Thursday/Friday: Practice at school up by the track,the front of the school or Hamlin. Take five different photomerges comprised of 3-5 pictures each.
Return to class at 11:45.
Merge your pictures in Photoshop using the directions above.
Weekend Homework: Go to one landscape location and shoot five different photomerges. This means you will shoot about 15-20 pictures
Monday/Tuesday: Off campus shooting
Wednesday/Thursday: editing
Tuesday, November 02, 2010
Photomerge Assignment
Your assignment over the next five to six days:
You will create Photomerge pictures. These are 3-5 pictures that overlap to show a wide landscape,cityscape, or sequence.
Your two Landscape style Photomerges should be taken at two different locations at two different times of day. Your sequence Photomerge can be taken any time at any place.
Use a tripod if possible. Remember to manual adjust white balance or select something like "cloudy" or "sunny" on your camera.
Summary
- Three locations
- One Photomerge from each location
- make sure each Photomerge is taken at a different time
Schedule:
Thurs/Fri: Out of Class Shooting
Fri-Mon: Photomerge Weekend Homework
All three locations are due next Mon


Tuesday, March 10, 2009
Your Photomerge Assignment

Your assignment over the next five to six days:
You will create Photomerge pictures. These are 3-5 pictures that overlap to show a wide landscape or cityscape (one big picture).
Your three Photomerges should be taken at three different locations at three different times of day: sunrise, afternoon, and sunset.
Use a tripod if possible. Remember to manual adjust white balance or select something like "cloudy" or "sunny" on your camera.
Summary
- Three locations
- One Photomerge from each location
- make sure each Photomerge is taken at a different time
Schedule:
Wed/Thurs: Out of Class Shooting
Fri-Mon: Photomerge Weekend Homework
All three locations are due next Mon/Tues
Tuesday, November 03, 2009
Photomerge Assignment
Your assignment over the next five to six days:
You will create Photomerge pictures. These are 3-5 pictures that overlap to show a wide landscape or cityscape (one big picture).
Your three Photomerges should be taken at three different locations at three different times of day: sunrise, afternoon, and sunset.
Use a tripod if possible. Remember to manual adjust white balance or select something like "cloudy" or "sunny" on your camera.
Summary
- Three locations
- One Photomerge from each location
- make sure each Photomerge is taken at a different time
Schedule:
Thurs/Fri: Out of Class Shooting
Fri-Mon: Photomerge Weekend Homework
All three locations are due next Mon
Wednesday, November 13, 2013
Turning in Your Photomerge Pictures
Today you will turn in Photomerge CS3.
You will then merge all of your new pictures.
Next you will edit all of your merged pictures in Photoshop.
At 11:15 you will turn in your best five Photomerges on a Contact Sheet. This Contact Sheet must contain at least one picture from each day of shooting.
You will also turn in your best Photomerge for grading. I will discuss printing the Photomerges in class.
Photomerge Grading:
1. Photomerege needs to look like one picture. Colors and objects in pictures should blend together perfectly without any errors.
2. Photomerege should showcase rule of thirds and foreground, mind-ground, and background subjects just like a landscape photo.
3. Photomerge should showcase an interesting location. Picture should look like something you would see in a calendar or framed on a wall.
You will then merge all of your new pictures.
Next you will edit all of your merged pictures in Photoshop.
At 11:15 you will turn in your best five Photomerges on a Contact Sheet. This Contact Sheet must contain at least one picture from each day of shooting.
You will also turn in your best Photomerge for grading. I will discuss printing the Photomerges in class.
Photomerge Grading:
1. Photomerege needs to look like one picture. Colors and objects in pictures should blend together perfectly without any errors.
2. Photomerege should showcase rule of thirds and foreground, mind-ground, and background subjects just like a landscape photo.
3. Photomerge should showcase an interesting location. Picture should look like something you would see in a calendar or framed on a wall.
Wednesday, March 26, 2008
Photomerge Assignment for Digital Photo

Your assignment over break.
You will create Photomerge pictures. These are 3-5 pictures that overlap to show a wide landscape or cityscape (one big picture).
Your three Photomerges should be taken at three different locations at three different times of day: sunrise, afternoon, and sunset.
Use a tripod if possible. Remember to manual adjust white balance or select something like "cloudy" or "sunny" on your camera.
Summary
- Three locations
- One Photomerge from each location
- make sure each Photomerge is taken at a different time
Thursday, April 05, 2007
Photomerge Assignment

Your assignment over break.
You will create Photomerge pictures. These are 3-5 pictures that overlap to show a wide landscape or cityscape (one big picture).
Your three Photomerges should be taken at three different locations at three different times of day: sunrise, afternoon, and sunset.
Summary
Three locations
One Photomerge from each location
make sure each Photomerge is taken at a different time
Thursday, November 01, 2012
Photomerge Assignment
Your assignment over the next five to six days:
You will create three Photomerge pictures. These are 3-5 pictures that overlap to show a wide landscape or cityscape
Your three Landscape/Cityscape style Photomerges should be taken at two different locations at two different times of day.
Use a tripod if possible. Remember to manual adjust white balance or select something like "cloudy" or "sunny" on your camera.
Summary
- Three locations
- One Photomerge from each location
- make sure each Photomerge is taken at a different time
Tentative schedule
Tuesday: shooting day, go to an AWESOME landscape location leave at the end of Ti2
Thursday: shooting day, go to an AWESOME landscape location, leave at TAP
Weekend: At least one more location
Note: I would shoot at least eight or nine Photomerges from each location. Shoot each attempt at a slightly different angle. Again, and I can't emphasize this enough, a tripod really helps.
Tuesday, October 07, 2008
Photomerge Assignment for Digital Photo
Your assignment over the next five to six days:
You will create Photomerge pictures. These are 3-5 pictures that overlap to show a wide landscape or cityscape (one big picture).
Your three Photomerges should be taken at three different locations at three different times of day: sunrise, afternoon, and sunset.
Use a tripod if possible. Remember to manual adjust white balance or select something like "cloudy" or "sunny" on your camera.
Summary
- Three locations
- One Photomerge from each location
- make sure each Photomerge is taken at a different time
Subscribe to:
Posts (Atom)