Thursday, March 30, 2017

Long Exposure

Photo 2: Long Exposure Assignments

This assignment will be broken into three parts.
 Part 1 is Light Painting. Click here to see some amazing examples.
Part 2 is nighttime long exposure. Click here to see some awesome examples.
Part 3 is long exposure pictures of your choice. You can do light painting, you can shoot outdoors at night, or you an experiment with something different. You can use people as needed. You can even shoot early morning or late evening instead of at night.




Long exposure photographyLong exposure photography
Schedule:
Thursday March 30: Practice long exposure and light painting at school.
Tuesday April 4th: Bring lights to class. Shoot in studio or at home.
Thursday April 6th: Bring lights to class. Shoot in studio or at home.
Shooting Day 1. Contact Sheets due both days.
Homework (you can start now): One outdoor long exposure 24 photo shoot done at night or early morning.
Long exposure shots of your choice.
April 9th: Homework due.
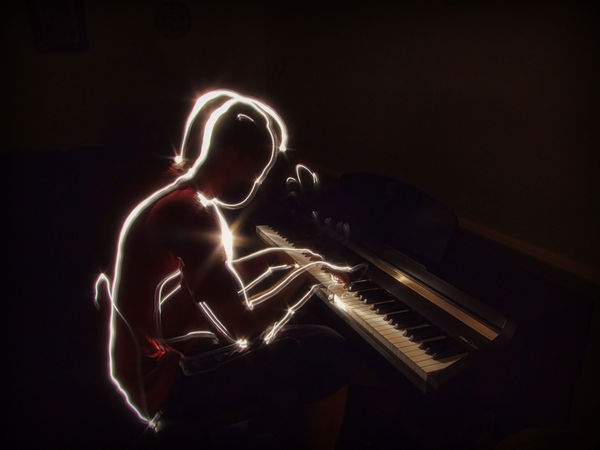
Image by gnackgnackgnack

Friday, March 24, 2017

Player Controller 3/24

using System.Collections;
using System.Collections.Generic;
using UnityEngine;

[System.Serializable]
public class Boundary
{
    public float xMin, xMax, zMin, zMax;
}

public class PlayerController : MonoBehaviour 
{
    public float speed;
    public float tilt;
    public Boundary boundary;

    void FixedUpdate () 
    {
        float movehorizontal = Input.GetAxis ("Horizontal");
        float movevertical = Input.GetAxis ("Vertical");

        Vector3 movement = new Vector3 (movehorizontal, 0.0f, movevertical);

        GetComponent<Rigidbody> ().velocity = movement * speed;
        GetComponent<Rigidbody> ().position = new Vector3 
            (
                Mathf.Clamp (GetComponent<Rigidbody> ().position.x, boundary.xMin, boundary.xMax), 
                0.0f, 
                Mathf.Clamp (GetComponent<Rigidbody> ().position.z, boundary.zMin, boundary.zMax)
            );
        GetComponent<Rigidbody>().rotation = Quaternion.Euler (0.0f, 0.0f, GetComponent<Rigidbody>().velocity.x * -tilt);
    }
}

Wednesday, March 15, 2017

Export Video Settings

Exporting From Adobe Premiere Pro

These are the settings to export HD Quality Video

File>Export>Media

Format=Quicktime
Preset=HD 1080i 29.97
Video Codec H.264

Name your file in the Output Name. 


Make sure you look where you are saving the file. 

Click Export
Find your project in the area you saved it on the computer.

Next, drop your video in the Vidstore Server. Don't forget to use the Naming Convention: 2-mitchellt-Sequence.

Click on background
Select Go up top
Select Connect to server
Type Vidstore.shorelineschools.org    
Name: scvideo
Password: Outback23
Select SC Video classes
Place video proper class period.

Monday, March 13, 2017

Greyscale Editing

Good morning. 

 Photo 2 students: please find two partners and teach them all the greyscale adjustments methods from last semester.
 Go step by step and have the other students take notes.
 These include Calculations, Ansel Adams, Basic Channel Mixer, Basic Black and White, and Duotone.
Edit 6 candids in grayscale today. Do not turn these pictures in yet.
Also, please work through the tutorials below.

Tomorrow is a Candid Off Campus picturing taking day.
I will try to arrange it so that students can use Highlander Home time to take pictures.
You must have a C or better to leave campus. Please turn in any missing work right now.

Don't forget your Candid homework assignment is due Thursday.

Extra detailed Ansel Adams Tutorial:
https://www.youtube.com/watch?v=IGwLqoL38-o

Black and white adjustment layer technique:
https://www.youtube.com/watch?v=yan0invgros

Curves and Channel Mixer Technique:
https://www.youtube.com/watch?v=Cq_sCa6shE8

Tuesday, March 07, 2017

Photo 2 Candid Photography

http://digital-photography-school.com/11-tips-for-better-candid-photography
http://digital-photography-school.com/make-yourself-invisible-5-tips-for-successful-candid-photography

Your assignment over the next week is  to shoot three contact sheets full of candid photos between now and Tuesday March 8 . 
One of these contact sheets will be shot during class on Thursday March 9th at Shorecrest.You will take candids of students and staff during this day. Some of these pictures could end up in the Yearbook.
The next contact sheet will be homework done at multiple locations of your choice due on Thursday, March 16th.
The next shooting day will Tuesday the 14th and you will shoot at multiple locations of your choice.

SC Candid  due Thursday March 9th.
Candid CS2 due Tuesday, March 14 th.
Candid CS3 (homework) due Thursday, March 14th. 
For each picture you should emphasize a specific composition element other than rule of thirds.
If you need a refresher on composition elements they can be reviewed at:

http://cybercollege.com/tvp023.htm
http://cybercollege.com/tvp024.htm
http://cybercollege.com/tvp025.htm

These include, but are not limited to: frame within a frame, leading lines, color contrast, movement and meaning, multiple levels of meaning, leading the subject, and using light to highlight or enhance a certain section of your picture. Move the camera around. Shoot high and low angles.

For this assignment I want you to get as far away from Shorecrest as possible. Downtown Seattle, Capital Hill, Fremont, and the U District are all great places to shoot "random" people, but Lake Forest Park could be just as effective. Make sure you ask permission to take pictures (especially if you are taking pictures of kids).


Unintentional out-of-focus pictures will not be accepted. If you would like to try a some selective focus shots please tell me before you go out shooting and I can lend you a long lens.

Getty Images Candid Pics
Image result for candid photos street life Image result for candid photos seattleImage result for candid photos seattle
Image result for candid photos excellentImage result for candid photos excellent teachersImage result for candid photos street life

Friday, March 03, 2017

Timer Script (Note: This script does NOT include the restart or jump scripts listed in the previous posts)

using System.Collections;
using System.Collections.Generic;
using UnityEngine;
using UnityEngine.UI;
using UnityEngine.SceneManagement;

public class PlayerController : MonoBehaviour {

    public float speed;
    public Text countText;
    public Text winText;
    public Text text;

    private Rigidbody rb;
    private int count;

    float timeLeft = 30.0f;

    void Start ()
    {
        rb = GetComponent ();
        count = 0;
        SetCountText ();
        winText.text = "";
    }

    void FixedUpdate ()
    {
        float moveHorizontal = Input.GetAxis ("Horizontal");
        float moveVertical = Input.GetAxis ("Vertical");

        Vector3 movement = new Vector3 (moveHorizontal, 0.0f, moveVertical);

        rb.AddForce (movement * speed);
       
    }

    void OnTriggerEnter(Collider other)
    {
        if (other.gameObject.CompareTag ("Pick Up"))
        {
            other.gameObject.SetActive (false);
            count = count + 1;
            SetCountText ();
        }
    }


    void SetCountText ()
    {
        countText.text = "Count: " + count.ToString ();
        if (count >= 13)
        {
            winText.text = "You Win!";
        }
}


        void Update()
        {
            timeLeft -= Time.deltaTime;
            text.text = "Time Left:" + Mathf.Round (timeLeft);
            if (timeLeft < 0) 

           {
                SceneManager.LoadScene ("gameOver");
            }
        }   


    } 

Restart Script: Note the name of the scene in SceneManager

using System.Collections;
using System.Collections.Generic;
using UnityEngine;
using UnityEngine.UI;
using UnityEngine.SceneManagement;

public class PlayerController : MonoBehaviour {


    public float speed;
    public Text countText;
    public Text winText;

    private Rigidbody rb;
    private int count;
    private bool grounded = true;

    void Start ()
    {
       
        rb = GetComponent();
        count = 0;
        SetCountText ();
        winText.text = "";
    }
    void FixedUpdate ()

{
      float moveHorizontal = Input.GetAxis ("Horizontal");
      float moveVertical = Input.GetAxis ("Vertical");

       
        Vector3 movement = new Vector3 (moveHorizontal, 0.0f, moveVertical);

        rb.AddForce (movement * speed);

        if (Input.GetKeyDown (KeyCode.Space)&&grounded)
        {
                rb.velocity = new Vector3 (rb.velocity.x, 5, rb.velocity.z);
                grounded = false;
            }
        if (Input.GetKey (KeyCode.R))
        {
            //load that level
            SceneManager.LoadScene ("Roll A Ball Mod");
        }


    }
    void OnTriggerEnter(Collider other)
    {
        if (other.gameObject.CompareTag ("Pick Up"))
        {
            other.gameObject.SetActive (false);
            count = count + 1;
            SetCountText ();
        }
      }
        void OnCollisionEnter (Collision Other)
        {
            if (Other.gameObject.CompareTag ("Ground"))
            {
                grounded = true;
            }
        }
    void SetCountText ()
    {
        countText.text = "Score :" + count.ToString ();
        if (count >= 12)
        {
            winText.text = " You Win!";
        }
    }

}
  

Wednesday, March 01, 2017

Editing Tourism Assignment

You will edit your ten best Tourism pictures today in Photoshop. Please choose 10 diverse pictures showcasing a variety of subjects in a variety of locations using a variety of composition and elements of design. Please do not use pictures that repeat single subjects if you can avoid it.

Please adjust and edit in Photoshop using the magic wand, quick selection tool, using cropping, burning, dodging, content-aware fill, and clone stamp.
You can also adjust using a variety of Layer Adjustments located just above the Layers palette.

Please try to improve color, lighting, and composition within each photo.

At the end of the period will turn in one 10 picture, 2*5 contact sheet called "Tourism Adjusted." 
You will also turn in your best single picture a a jpeg file. This will be called "Best Tourism Photo."


Jump Script

using System.Collections;
using System.Collections.Generic;
using UnityEngine;
using UnityEngine.UI;

public class PlayerController : MonoBehaviour {

    public float speed;
    public Text countText;
    public Text winText;

    private Rigidbody rb;
    private int count;
    private bool grounded = true;

    void Start ()
    {
       rb = GetComponent<Rigidbody> (); 
        count = 0;
        SetCountText ();
        winText.text = "";
    }

    void FixedUpdate ()
    {
        float moveHorizontal = Input.GetAxis ("Horizontal");
        float moveVertical = Input.GetAxis ("Vertical");

        Vector3 movement = new Vector3 (moveHorizontal, 0.0f, moveVertical);

        rb.AddForce (movement * speed);

        if (Input.GetKeyDown (KeyCode.Space) && grounded)
        {
            rb.velocity = new Vector3 (rb.velocity.x, 10, rb.velocity.z);
            grounded = false;
        }

    }

    void OnTriggerEnter(Collider other)
    {
        if (other.gameObject.CompareTag ("Pick Up"))
        {
            other.gameObject.SetActive (false);
            count = count + 1;
            SetCountText ();
        }
    }

    void OnCollisionEnter (Collision Other)
    {
        if (Other.gameObject.CompareTag ("Board"))
        {
            grounded = true;

        }

    }


    void SetCountText ()
    {
        countText.text = "Count: " + count.ToString ();
        if (count >= 12) {
            winText.text = "You Win!";
        }
    }


}

Friday, February 17, 2017

Sequence Reading and Examples


Group 10-shot Sequence: A sequence is a series of shots connected together as part of a whole scene.


Example 1:


Example 2:


Example 3:


Example 4:


10-12 different action oriented shots

· Insert Shot

· Reaction Shot (cutaway)

Shoot a master shot of the whole sequence beginning to end

· Shoot every shot three different times from three different angles

· Raw Footage will be graded

· Edited video should include fade in/out, title, music, sound effects, and credits over black

No jump cuts

No continuity errors

Do not cross the Axis Line

All shots in focus. 
To receive credit at all on this assignment you cannot have any errors. All groups must edit sequences individually.

Monday, February 13, 2017

Tourism Magazine Assignment


You work for a tourism magazine. 
 Your job as the Photojournalist for the Tourism Magazine is to take pictures that will encourage people to visit or move to a specific town or neighborhood. In other words, you need to take pictures of everything this town or neighborhood has to offer. 
  • Take (literally) a few hundred pictures in Shoreline/Lake Forest Park or the location of your choice. 
  •  Please try to get to at least five or six locations within Shoreline/Lake Forest Park or your location of choice.
  • Shoot landscape, portrait, pattern, shadow, action, macro, candid, and abstract shots.
  • Try to shoot as many of the Elements of Design as possible:unity, texture, line, form, contrast, color, texture, balance, rhythm, positive/negative space.
    The Principles of Design in Photography | Trent Sizemore Photography
    http://photoinf.com/General/Robert_Berdan/Composition_and_the_Elements_of_Visual_Design.htm
     http://photoinf.com/General/Geoff_Lawrence/Composition.html
  • Don't forget about all the parks, trails, streams, nightlife, coffee shops, and even some of the stores.
  • If you are leaving over mid-winter breaking to some place interesting (like Maui) you can do the assignment on vacation.
  • You will shoot pictures around Shoreline/Lake Forest Park on Thursday, February 16. You can use these for your final product or keep these pictures as practice. You must turn in a contact sheet when you return to class.
  • You will turn in two 48 picture contact sheets when you return from mid-winter break.

At the end of the assignment you will turn in 10 high quality images. You will name each image using the Element of Design that fits best.

 To receive an A you must go to a variety of locations, shoot a variety of interesting subjects, use a variety of the Elements and Principles of Design.


Manual Work Photo 1/2

  • You can shoot anywhere within walking distance of the Shorecrest campus.
  • All pictures should showcase your ability to shoot with proper composition, which includes rule of thirds, proper headroom, and leading the subject.

  1. Regular Action Shooting
Place the camera in Manual mode.
Shoot 30-40 pictures of moving subjects using traditional fast shutter speeds (usually 1/250-1/2000). The entire picture should be in focus.
Have your subjects repeat the same action over and over. Adjust the aperture as needed to ensure proper lighting. 
Don’t forget to show faces.
Your goal is to get 10-12 great shots. Keep shooting until you feel you have at least 10-12 great shots.

Suggested activities to shoot: someone running across the field, someone doing jumping jacks, someone doing back handsprings or other gymnastic moves, or (if you have any sporting equipment) take pictures of someone playing catch with a football, baseball, or Frisbee etc.

  1. Depth of Field Practice

Put the camera in manual (aperture mode).
Shoot 10 Shots of the exact same subject from the exact same angle.
Adjust the Aperture from low to high between each shot.
Start at a wide open aperture setting of f4.0 and work your way down to f29.
I would suggest shooting a flower or tree close up with something else in the deep background.