
First, make sure your pictures are organized by day (make a separate folder for each day's pictures).
Select on just one of your pictures that you took for this project. Right click 'Get Info.' You'll notice that the dimensions are listed under more info.
Write these dimensions down.


Open Adobe Premiere. Create a new project (File>New>Project) and name it Stop Motion. Click OK.
Select Digital SLR>1080p>DLSR 1080p30 and name your sequence. DO NOT CLICK OK YET.


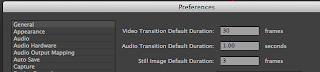
Go to Adobe Premiere>Preferences in the upper left hand corner
and change the Still Image Default Duration to 3. (If your pictures play
too slow after changing these settings try changing them to 2).

Next, go to File>Import and your picture folders. Note: import each day of photos in their own folders. DO NOT MIX THE PHOTOS.


No comments:
Post a Comment