Tuesday, April 26, 2016

Forced Perspective

Tuesday in Photo 1:
Use the entire period to
shoot Forced Perspective shots around the campus. Have fun. Be creative. Work in groups of two or three if necessary.
Turn in a ten picture contact sheet at the end of the period.
Thursday you will do the same away from school.

Examples
http://www.instantshift.com/2010/08/24/88-brilliant-examples-of-forced-perspective-photography/


Monday, April 11, 2016

Import Stop Motion Pictures To Computer


  • Plug in your camera to the computer or place your memory card into the back of the computer in the horizontal SC Card slot.
  •  Import your pictures by first opening Image Capture. Image capture is location in the Applications folder. You can also search for it in the upper right hand corner and open it there.
  • You should see your pictures in Image Capture. Select on the pictures you want to import and make sure you notice where you are saving the pictures at the very bottom. You can shift+click or command+click to select on specific pictures.


After you import your pictures make a folder for your pictures. If you shot on multiple days please make sure your pictures are organized by day (make a separate folder for each day's pictures).

Wednesday, April 06, 2016

Action Script for CYOA: Buttons and Mouse Control

Action Script 2.0: Stops and Mouse Control

Button:
http://www.youtube.com/watch?v=NLP7A9IYptU

Action Script 2.0
https://www.youtube.com/watch?v=A6e-gdU_XCM

Action Script 2.0

http://www.youtube.com/watch?v=Q-QkWaY9y1o&feature=related

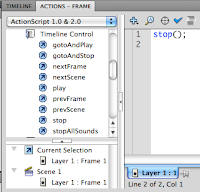
To create a STOP action script on the TIMELINE do the following:
1. Click on the Stop Layer  in the timeline and click the exact frame where you want your STOP to occur.
2. Control click and select Actions.
3. Under TIMELINE CONTROL in the upper left hand corner double click STOP.


4. stop(); should show up in the coding section on the right hand side.

To create ACTION SCRIPT for your button do the following:
1. Click the frame that your button appears in the timeline (make sure your button is on it's own layer).
 2. Click directly on your button you have created down in the work area (not on the timeline).
3. Control Click>Actions
4. Under MOVIE CLIP CONTROL select ON and then RELEASE

5. Move the cursor to the second line
6. Under TIMELINE CONTROL select GOTO AND PLAY and then type in the frame where you want the button to transport the gamer player on the timeline.
Note: at the bottom of the Action Script commands under Current Selection your button should be selected under current selection:

Tuesday, April 05, 2016

Turning In Action Photos

Turn in 12 full size SC Action pictures into the Vidstore Public Folder. Make sure the sport name and your name is on the folder.
Turn in a 4*4 16 picture Contact Sheet with your best eight pictures adjusted from each day of shooting. Call is Action Adjusted CS.
Turn in your best SC Action as a jpeg.
Turn in Best Away From School Action as a jpeg.

Photo 2: Urban Landscape Assignment

Urban Landscapes


Think hard about the at least 10 specific locations in Shoreline, or the greater Seattle area where you could go to take some amazing examples of Urban Landscape photography.
(You should think of 2 possible locations for each of the 5 categories listed below).


Here are a few great tips on Urban Landscape photography:

1. Early Bird Catches the Worm – First thing in the morning is a great time to shoot for a number of reasons including that the light is diffused and the ‘sky acts like a giant filter’. I find that early morning shots can be great for other reasons too:
  • Clean Streets - Most street cleaning happens over night and the early morning often finds urban scenes with less litter to clutter your shots.
  • People Free Shots - Shots around dawn have less likelihood of being cluttered by people. It’s amazing who lonely a city can look if you’re able to get a people free shot.
  • Different Activity – Of course you might want people in some of your shots – It’s amazing how an urban area can change depending upon who is around. While at 9 am you’ll get a peak hour feel to your shots and on the weekend at midday you might get a crowd of shoppers – in the wee hours of the morning there’s a whole different group of people wandering the streets can give your shots a whole new focal point.

2. Prospective Perspectives – I would suggest that the shape of the buildings that you’re shooting should alter the way you frame your images. Buildings with domes should include background to help viewers appreciate it’s form and square buildings look best when shot at a 45-60 degree angles.


3. Up and Coming – Don’t just photograph the finished product when it comes to buildings but also focus upon construction areas, or areas of decay, and what has been forgotten or is being built and/or renovated.


4. Permission to Shoot – Some places don’t allow public photography and you might need to get a license and/or other form of permission to photograph them. You could liken it to getting a model release when photographing people. Getting permission can mean the difference between owning copyright or not of the images you take in some instances. This will of course vary from place to place.


5. Angle Attack – Find new angles to photographing well known buildings. Find areas of them that are hidden from the average photographer and look for interesting patterns, shapes, textures, reflections and angles that highlight the details of the building that might have previously been missed by others. 

Shooting Days and Homework
April 7th: In class shooting day
April 11: One Homework Contact Sheet Due
April 13: In Class Shooting Day