Thursday, October 31, 2013

Photomerge Assignment


Your assignment over the next five to six days is to take multiple landscape panorama style photomerges.  Take a picture and then move the camera slightly up or sideways to take another "connected" image. Basically you combine smaller pictures to make one larger picture.

Use a tripod if possible. Remember to manual adjust white balance or select something like "cloudy" or "sunny" on your camera.


Here is how you connect multiple pictures in Photoshop.

To set up a new Photomerge composition:
Do one of the following:
Choose File > Automate > Photomerge.
In the File Browser, select the images you want to use and then choose Automate > Photomerge from the File Browser menu bar
In the dialog box, choose an option from the Use pop-up menu:
  • Files to generate the Photomerge composition using individual files.
  • Folders to use all the images stored in a folder to create the Photomerge composition. The files in the folder appear in the dialog box.
  • Open Files to use the image files you have open in Photoshop.
Click the Browse button to navigate to the source files or folder you want to use to create the Photomerge composition. Select Attempt to Automatically Arrange Source Images if you want Photoshop to try to line the images up in their proper order.
Then edit your picture as you need.

Here is a tutorial you can use to get you going.
http://www.youtube.com/watch?v=qrNI-gAuI5s


Tentative schedule

Friday: Practice at school up by the track,the front of the school or Hamlin. Take five different photomerges comprised of 3-5 pictures each.
Return to class at 11:30.
Merge your pictures in Photoshop using the directions above.

Weekend Homework: Go to one landscape location and shoot five different photomerges. This means you will shoot about 15-20 pictures
Monday: editing
Wednesday: shooting day, go to an AWESOME landscape location to take more pictures



Wednesday, October 30, 2013

Action Photo Editing

Please select your twelve best action photos.
These pictures should show faces, be 95% in focus, fill the frame, and showcase interesting angles and composition.
Eight of these photos need to be from your SC club, sport, or event pictures.
Crop, adjust, and color correct all pictures.

Edit two pictures into Grayscale.
Edit two pictures using Selective Focus.
Edit one picture using one-item kept in color.
Edit the other seven pictures in what ever manner you see fit.

Turn in your twelve adjusted photos and call them Action Adjusted.
Turn in your best SC action picture for printing. Call it Best Action for printing.

If you took pictures for Swimming, Football, Cheer, or Flags please create a folder with your best, in-focus pictures and turn them into Ms. Johnson's Drop Box on the Staff Server. Please let Ms. Johnson and the yearbook staff know that your pictures are in the Drop Box.

Tuesday, October 29, 2013

Digital Photo: Are you caught up?

Have you turned in Action CS1 and Action CS2?
Did you shoot 50 action pictures of a SC sport, club , or group?

Stop Motion Assignment


Your next project is a 600-800 frame stop motion animation assignment. You will work in groups of three to four to make people do things that aren't possible in real life.
You will have two full class periods to shoot your assignment using my digital cameras. You will edit your videos in Adobe Premiere and add sound effects and music.


http://www.youtube.com/watch?v=AJzU3NjDikY

http://www.youtube.com/watch?v=MtbQ4J3RfQ8&feature=related

http://www.youtube.com/watch?v=2_HXUhShhmY&feature=related

http://www.youtube.com/watch?v=DKWdSCt4jGE


http://www.youtube.com/watch?v=qBjLW5_dGAM

http://www.youtube.com/watch?v=BpWM0FNPZSs&feature=related

http://www.youtube.com/watch?v=o2pvO-FEqq4&feature=related

http://www.youtube.com/watch?v=5m23bL9AqB0&feature=related

http://www.youtube.com/watch?v=cYhhfHYZa5s&feature=related

Stop Motion Pre-Production

Please get in your groups and start planning your production.

1. Please use TEXT EDIT and turn in the following information in the STAFF server:

  • Group Member names
  • A four to five sentence description of your animation project. 
  • Please tell me what special "tricks" you will create to make your animation look interesting. What will your characters do that they can't do in real life?
  • Also, let me know if you are using props or if the characters are wearing costumes. Who will wear what outfits?
  • Most importantly please tell me the story from beginning to end.
  • What type of music will you use? Why?
  • What kind of sound effects will you add?
2. Create a storyboard of the first 45 frames.

 Each video will need:

1.                 Fade In/Out

2.                 Titles

3.                 Credits

4.                 Music and sound effects

Tuesday, October 15, 2013

Action Script 2.0: Stops and Mouse Control

Button:
http://www.youtube.com/watch?v=NLP7A9IYptU

Action Script 2.0
http://www.youtube.com/watch?v=PdvPEaoU7tg&feature=related

Action Script 2.0

http://www.youtube.com/watch?v=Q-QkWaY9y1o&feature=related


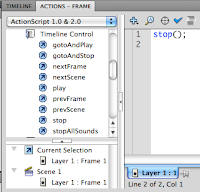
To create a STOP action script on the TIMELINE do the following:
1. Create a STOP layer on your animation timeline.
2. Control click and select Actions.
3. Under TIMELINE CONTROL in the upper left hand corner double click STOP.


To create ACTION SCRIPT for your button do the following:
1. Click the frame that your button appears in the timeline (make sure your button is on it's own layer).
 2. Select directly on your button you have created down in the work area (not on the timeline).
3. Control Click>Actions
4. Under MOVIE CLIP CONTROL select ON and then RELEASE

5. Move the cursor to the second line
6. Under TIMELINE CONTROL select GOTO AND PLAY and then type in the frame where you want the button to transport the gamer player on the timeline.
Note: at the bottom of the Action Script commands under Current Selection your button should be selected under current selection:


Monday, October 14, 2013

Manual Settings Class Assignment 2


1.Panning

You should shoot 10-12 SUCCESSFUL panning style pictures using shutter speeds of around 1/20-1/60. Shoot just like the motorcross photographer suggested.
Suggested activities to shoot: someone running across the field, someone doing back handsprings or other gymnastic moves, anyone playing catch with a football or baseball, and hackysack etc.  
2. Regular Action Shooting

Then shoot 10-12 pictures of moving subjects using traditional fast shutter speeds (usually 1/250-1/2000).
Have your subjects repeat the same action over and over.

 Suggested activities to shoot: someone running across the field, someone doing back handsprings or other gymnastic moves, anyone playing catch with a football or baseball, and hackysack etc.  


3. Depth of Field Practice

Put the camera in AV (aperture mode).
Shoot 10 Shots of the exact same subject from the exact same angle.
Adjust the Aperture from low to high between each shot.
I would suggest shooting a flower or tree with something else in the background.

You will turn in three Contact Sheets at the end of the period named Panning, Action, and Aperture.

Wednesday, October 09, 2013

Photo 1: Aperture and Shutter Speed

Manual Adjustments:Aperture and Shutter Speed

http://cybercollege.com/tvp012.htm
http://www.picturecorrect.com/photographytips/208/aperture_fstops_camera_settings.htm

http://en.wikipedia.org/wiki/Aperture
http://en.wikipedia.org/wiki/F-number


F-Stops and Shutter Speed Hints

Please take detailed notes in your own words on the top two reading assignment. You will using the material you learn this week on the cameras.

Camera simulator:
http://www.photonhead.com/simcam/shutteraperture.php

http://www.kamerasimulator.se/eng/?page_id=2

http://dryreading.com/camera/index.html

htthttp://camerasim.com/camera-simulator/

Grayscale Adjustment Assignment

First, adjust all of your pictures into the various grayscale methods we have discussed in class. Start with the man-made shadow pictures you shot over the last couple of days.

When you are done you are going to turn in your best 20 pictures in a Contact Sheet called Grayscale Adjusted. Please make sure you have all adjustment methods included you must have at least two man-made shadow pictures.

The adjustment methods: Basic Black and White (BBW), Calculations Method (CM), Lightness Channel (LC), Ansel Adams(AA), Duotone (DUO), and Basic Channel Mixer (BCM).

Please save and name each picture with the appropriate adjustment method abbreviation (BBW or CM etc.)


Finally, turn in your Best Grayscale picture as a .jpg file.

Monday, October 07, 2013

Choose Your Own Adventure Animation Assignment

CHOOSE YOUR OWN ADVENTURE ASSIGNMENT:
For this project you will be creating an adventure of some sorts that pauses periodically and gives the viewer a choice in where the story goes, thus a "choose your own adventure" tale! Your movie must contain:

* 8 Buttons

* goto and play
* stop
* up, over, down, hit states
* no stick figures
*multiple motion and shape tweens
* movie clips
* at least three instances of sound, sound should FILL your animation
At least three places where decisions need to be made


Please answer the questions below in Text Edit and drop the responses into the Staff Server>Mitchell>Classes>Period 2 or 4.

* Who are the characters? List at least two.
Where does the story take place?List precise location with details.
* What is the main story from beginning to end? What is the main character trying to do?
* What are the options in the choose your own adventure? What are the outcomes?
* How will your animation be more interesting and better looking than your last project?

Tuesday, October 01, 2013

SCNN Commercials: Export your Animation Project and Turn It In To the Vidstore Server


Exporting From Flash to Quicktime

File>Export>Export Movie>Quicktime

Save it using the naming convention. Save it in your movies folder.
Change the Store temporary file to disc.


Next, log onto to Vidstore.shorelineschools.org and drop it in the period 2 or 4 folder.

  • Click on your desktop background.
  • Go
  • Connect To Server
  • Vidstore
  • name:scvideo
  • password:Outback23
  • SC Video Classes
  • Drop the Quicktime file into the 2nd or 4th period folder.